In many farms and greenhouses, data is collected as isolated readings: one temperature sensor “in the middle”, one soil moisture reading “in a row”, one EC/pH check per week. The issue is that plants don’t live in averages. They live in zones, shaped by airflow, shading, slopes, soil texture changes, distance to water or heating sources, and by how the team operates day to day.
A well-built sensor map is not just a nice visualization. It’s a management tool: it shows you where conditions repeat and where they diverge, so you can make decisions by crop zones, not by assumptions.
This article explains why zones matter more than isolated readings, what to measure for different operations, how GrowGuard supports live monitoring, maps, forecast, AI-assisted phytosanitary alerts, AI Plant ID, reports, team access, and sensor integration via LoRaWAN, NB-IoT, MQTT, or TTN API imports.
1) Why an isolated reading can mislead you
Isolated readings are tempting: they’re easy to interpret and can feel “good enough.” In practice, two accurate numbers can still lead to the wrong conclusion if you don’t know where they come from and what they represent. A temperature sensor near a door, a humidity sensor next to a drip line, or a soil probe in a different soil texture describes a local microclimate, not the whole crop.
In greenhouses, differences appear across short distances: vents, heaters, row ends, shaded areas, corners with poor airflow. In open fields, variation comes from slope, drainage, compaction, soil type, wind exposure, and uneven irrigation. With live monitoring you can spot these differences immediately—but only if you have multiple points and a way to compare them.
One “good” value can hide a stressed zone. For example, an average temperature may look acceptable, while a cool, wet zone increases disease pressure and a hot, dry zone pushes water stress. The right decision is rarely “change the setting for everything.” It is “intervene where needed,” and sometimes “don’t intervene,” so you don’t harm other zones.
2) What “crop zones” mean and how to define them in practice
A crop zone is an area where conditions are similar enough that plants respond in a similar way. It doesn’t have to be perfectly uniform; it must be predictable. Zones can be greenhouse compartments, sections along rows, orchard blocks, vineyard terraces, field strips, or even micro-zones inside tunnels.
Defining zones starts with a simple map of your operation: where heat sources are, where vents are, where water enters, where slopes are, and where you have historical issues (disease, water deficit, salinity). Then you choose measurement points that confirm or correct those assumptions.
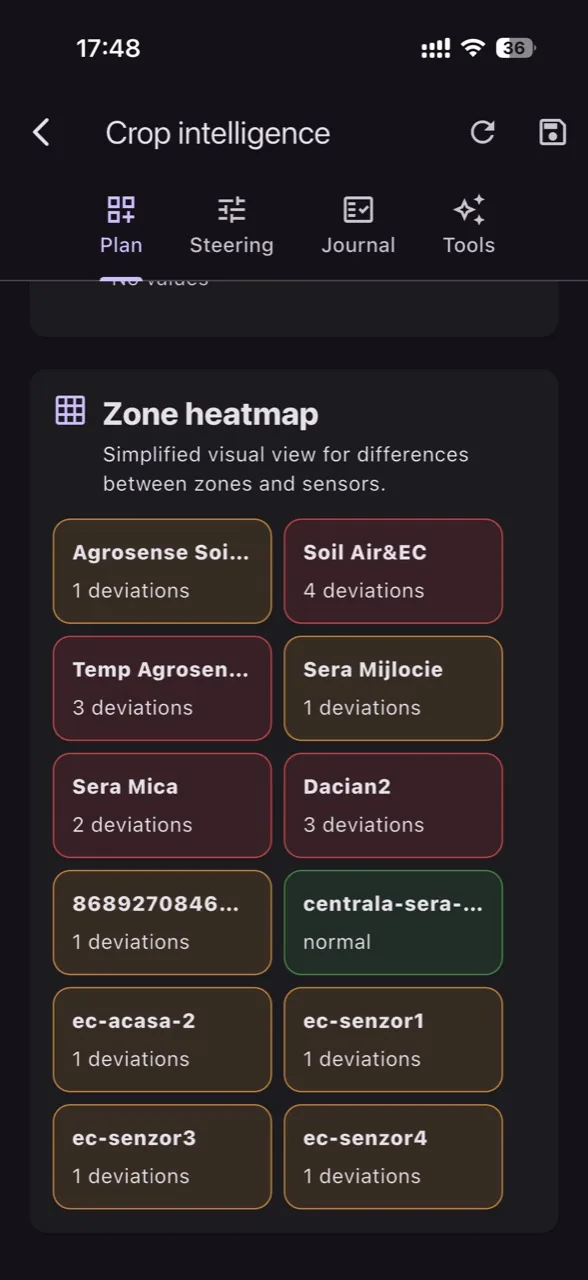
In GrowGuard, a sensor map helps you link each sensor to a position and a zone. When you see values in context, not just in a list, it becomes clear whether a “spike” is a local incident (for example, an open door) or a recurring pattern in a zone (for example, consistently weak airflow).
3) What to measure: a minimum set and a full set, by farm type
A useful system starts from the decisions you want to make. Below are common measurements and the decisions they support, relevant for greenhouses, flower farms, vegetable farms, orchards, vineyards, and sensor distributors.
Microclimate: temperature, air humidity, and VPD. Temperature and humidity are the foundation, but VPD (Vapor Pressure Deficit) translates their combination into a transpiration indicator. In greenhouses, VPD helps you balance ventilation, heating, and shading so the plant is neither stressed (VPD too high) nor prone to condensation and disease pressure (VPD too low).
Soil and irrigation: soil moisture, soil temperature, sometimes salinity. For irrigation, zone-based soil moisture is more useful than a single number. Two zones can receive the same irrigation volume yet dry down differently, calling for different schedules or a uniformity check of the drip system. Soil temperature helps explain growth pace and the risk of shock from irrigation or fertigation, especially in early spring or in protected structures with large day/night swings. In substrates, dynamics can be even faster, making live monitoring critical to avoid moisture “oscillations” that stress roots.
4) Nutrition and water quality: EC and pH as control indicators
EC and pH are two measurements that make the difference between “we fertilized” and “the plant can use nutrients.” In greenhouses and hydroponics, solution EC and pH directly affect uptake. In soil-grown vegetables, EC can signal salt accumulation, especially in poorly drained zones or under intensive irrigation.
From a zone perspective, EC and pH must be interpreted together with soil/substrate moisture. High EC in a drier zone can mean concentration due to evaporation, not necessarily an excessive dose. Conversely, low EC in a very wet zone can point to leaching or overwatering.
In GrowGuard you can follow these values in live monitoring and correlate them with events: irrigation, fertigation, rainfall, recipe changes. Reports help you see weekly trends and document decisions for the team or for end customers (in the case of distributors and integrators).
5) Sensor maps in greenhouses: from “climate” to microclimate and compartment management
In greenhouses, differences over a few meters can be bigger than expected: thermal stratification, drafty spots, shaded areas, zones that stay wet after irrigation. A well-planned sensor map shows whether your climate settings are producing uniform effects or only “fixing” one point.
Practically, the map helps answer questions such as: where does VPD drop below a threshold at night (condensation risk), which zone overheats at midday (stress), where does humidity remain high after irrigation (insufficient ventilation), where do persistent differences appear between row ends (possible airflow distribution issues).
With GrowGuard you can see these differences in real time, and if you operate multiple compartments or tunnels, team access allows each responsible person to monitor their zones without getting lost in everyone else’s data.
6) Sensor maps in orchards and vineyards: topography, exposure, and phenology
In orchards and vineyards, zones matter because of topography and exposure: a south-facing slope warms differently than a north-facing one, and low areas can trap cold air. Relative humidity and temperature can vary enough to shift disease-risk windows and phenological pace.
A sensor map helps you compare blocks and plan scouting: where to check first for early stress signs, where to monitor frost risk, where irrigation may be needed sooner. This doesn’t mean you will automatically treat every zone differently; it means you have data-based priorities.
In GrowGuard, forecast combined with local data adds context: if a sharp change in temperature or humidity is coming, you can prepare the team, adjust irrigation, or plan applications when the weather window is favorable—without assuming it’s “the same everywhere.”
7) AI-assisted phytosanitary alerts and AI Plant ID: how they connect to zones, not general panic
AI-assisted phytosanitary alerts are more useful when anchored to zones. A risk estimate or an alert tied to favorable conditions (for example, long periods of high humidity with suitable temperature) only makes sense if you know where it is happening. Otherwise you end up with broad alarms that fatigue the team and increase the chance of being ignored.
With GrowGuard, alerts can be viewed in the map context: the same greenhouse may have one area with persistently low VPD and high humidity, and another with drier conditions. Instead of reacting uniformly, you prioritize scouting and checks where data indicates higher risk.
AI Plant ID doesn’t replace an agronomist, but it helps the team quickly verify identification of a plant, a symptom, or a weed while doing zone-based inspections. In a healthy workflow, data points you to the zone, the team verifies on site, and the decision is documented in reports.
8) From data to action: simple rules that work by zone
To turn a map into decisions, you need clear thresholds and rules tailored to your crop. Examples of indicative (not universal) rules: if a zone has persistently low VPD during certain time windows, check ventilation, nighttime heating strategy, or air circulation; if soil moisture drops faster in one zone, check drip uniformity and adjust duration or frequency; if EC rises after irrigation in a zone, investigate drainage or salt accumulation.
The key is calibration to the objective. In potted flowers, moisture and VPD control is often tighter than in open field. In greenhouse vegetables, day/night swings and canopy density can change microclimate quickly. In orchards, inertia is higher and decisions may focus on irrigation scheduling and spraying during suitable weather windows.
GrowGuard helps you see trends, not just single points. When a deviation becomes repetitive in a zone, it may justify a structural intervention (for example, balancing ventilation, fixing drip lines, changing shading strategy) rather than only a temporary correction.
9) Connectivity and integration: LoRaWAN, NB-IoT, MQTT, TTN API—and why it matters for distribution and scaling
For farms and distributors, it’s not only the sensors that matter, but how data reaches the system. LoRaWAN fits low-power local networks, useful for many points across large distances. NB-IoT can be an option when cellular coverage is available and you want deployments without a local gateway, depending on the context. MQTT is common for integrating with existing systems, and TTN API imports help when you already have The Things Network infrastructure.
GrowGuard can operate in these scenarios so that the sensor map includes different data sources in one view. For distributors and integrators, this reduces friction: you can standardize project delivery across different sensor brands while keeping the same interface for the customer.
Regardless of connectivity, a practical detail is system visibility: battery and sensor status. A map that shows not only values but also where batteries are running low or sensors are offline helps you plan maintenance and avoid “blind spots” in the zones where you most need data.
10) Reports, audit, and collaboration: why management needs history, not only live data
Live monitoring is excellent for fast response, but management also needs history: what happened over the last 7/30/90 days, how zones behaved, which interventions were performed, and with what outcome. Reports help standardize decisions and communication between owner, manager, agronomist, and field team.
In GrowGuard, reports and team access support a clear workflow: who sees what, who receives alerts, who confirms interventions. For multi-site operations, this reduces dependence on “the one person who knows everything” and supports knowledge transfer between seasons.
For distributors, reports can also serve as a support tool: you show the customer zone trends, explain why a sensor flagged a local issue, and demonstrate the value of a map, not just a list of numbers.
Conclusion
A sensor map changes how you run a crop: from reacting to isolated readings to managing by crop zones. You see microclimates, compare points quickly, identify patterns, and prioritize actions where the impact is real.
With GrowGuard, live monitoring, the sensor map, forecast, AI-assisted phytosanitary alerts, AI Plant ID, reports, team access, and integration via LoRaWAN, NB-IoT, MQTT, or TTN API help you turn data (temperature, humidity, VPD, soil moisture, EC, pH) into documented decisions—without unrealistic promises, but with better control and better targeted interventions.
If you treat the map as an operational tool rather than a chart, you will notice deviations earlier, reduce the risk of “blanket” interventions, and scale management across more structures or parcels while keeping clarity on each zone.